
An 11 oz mug typically prints across dimensions in the range of about 200×80 mm to 200×96 mm, while a 15 oz mug prints on a larger area approximately 213×103 mm, matching the size of a durable ceramic cat mug. The single best practice is to design at a generous starting canvas, ideally 4500×2100 pixels at 300 DPI. Then check your supplier's template overlay before uploading. For the exact figures per mug style, the table below covers every common variant.
TL;DR:
- Design at a minimum of 4500×2100 pixels at 300 DPI for the widest printable coverage across mug sizes.
- Use the supplier's template overlay to ensure artwork fits within safe zones, accounting for a production tolerance of about 1 to 3 mm.
- Keep critical details, text, and faces inside the safe area, avoiding placement near handles or edges for clarity and proper wrap-around.
- Save raster files as PNG or TIFF and vector files as PDF or SVG, always exporting at 300 DPI in sRGB color profile for best quality.
- Request a physical proof if ordering in bulk to confirm how designs translate onto curved surfaces and ensure placement accuracy.
Table of Contents
- Printable dimensions for common mug types
- Getting your canvas and pixels right at 300 DPI
- How do you avoid cropping near the mug handle?
- What file format and colour settings should you use?
- Pre-upload checklist before you order
- Design notes for personalised music mugs
- Why templates matter more than measurements
- Order a personalised music mug built around these dimensions
- Sources
Printable dimensions for common mug types
Every mug format has its own printable footprint, and the differences between an 11 oz mug and a 15 oz mug matter more than most first-time designers expect. Gelato's printable-area guidance lists an 11 oz mug at approximately 200×96 mm and a 15 oz mug at roughly 213×103 mm, though Tradeprint's ceramic mug specifications put a standard 330 ml mug closer to 200×80 mm with an 8 mm gap recommended from the top and bottom edges. That gap between sources isn't a contradiction so much as a reminder that "standard mug print size" varies by supplier and glaze finish, so the template overlay always has the final word.
Slim and enamel mugs behave differently again. Their tapered or straight-walled shape means less wrap coverage than a classic 11 oz mug, and the printable height often shrinks even when the width stays similar.
| Mug type | Approx. printable area (mm) | Typical margin |
|---|---|---|
| 11 oz (330 ml) ceramic | 200×80 to 200×96 mm | ~8 mm top/bottom |
| 15 oz ceramic | 213×103 mm | ~8 mm top/bottom |
| Slim/enamel | Narrower height, similar width to 11 oz | Varies by supplier template |
Production isn't laser-precise. Most suppliers, including Print Traders, build in a tolerance of around ±1 to 3 mm to account for hand placement and the curve of the ceramic surface. Templates already absorb this wobble, which is exactly why designing to the template rather than eyeballing a ruler measurement saves you from a returned order.
Getting your canvas and pixels right at 300 DPI
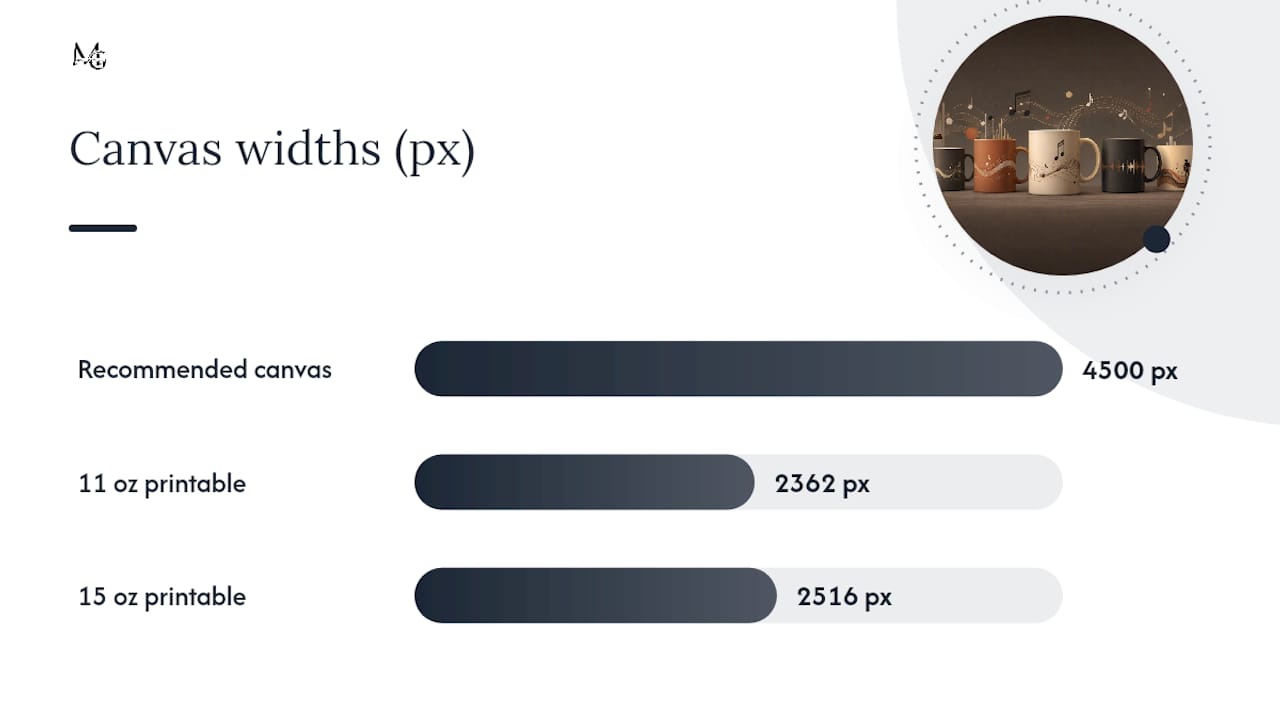
Pixels are where mug printing dimensions actually get made or broken. A design that looks crisp on screen at 72 DPI can turn soft and blurry once stretched across a curved ceramic surface, so Fourthwall's mug design guidance recommends starting at 4500×2100 pixels at 300 DPI to cover the widest wrap-around print area comfortably.
Converting millimetres to pixels at 300 DPI is straightforward once you know the formula: millimetres divided by 25.4, multiplied by 300.
- A 200×96 mm printable area (11 oz) becomes roughly 2362×1134 px at 300 DPI.
- A 213×103 mm printable area (15 oz) becomes roughly 2516×1217 px at 300 DPI.
Starting with a large canvas, such as around 4500×2100 pixels at 300 DPI, gives you room to reposition or crop the same artwork across different mug sizes without losing sharpness. Always preview the finished file inside each specific product variant before ordering. Template overlays shift between an 11 oz mug and a 15 oz mug, and a layout that sits perfectly on one can crop awkwardly on the other.
How do you avoid cropping near the mug handle?
Safe area and bleed are not the same thing, and mixing them up is one of the most common reasons a design gets cropped unexpectedly. The safe area is the zone where all critical content, text, names, faces, must sit; the bleed is the small buffer around the printable edge that gives the printer room for movement without leaving a white sliver.
- Leave roughly 8 mm of clear space from the top and bottom edges on most 11 oz templates, as recommended by Tradeprint, and treat anything closer to the edge as at risk.
- Avoid placing text, logos, or facial detail directly behind or across the handle seam, since this is where wrap distortion is most visible and where the design physically bends around the mug's curve.
- Keep fine detail, thin script fonts, small portraits, away from both the printable edge and the seam, since curvature softens sharp lines more than a flat surface ever would.
Curved ceramic surfaces genuinely change how detail reads. A design that looks pin-sharp on a flat monitor can lose crispness once wrapped, which is exactly why print-ready file guidance stresses keeping critical elements well inside the safe area rather than pushing them toward the printable boundary.
What file format and colour settings should you use?
Getting the file format for mug printing dimensions right the first time saves a round of back-and-forth with a supplier's design team.
- Use PNG or TIFF for full-colour raster artwork, since both preserve fine detail without the compression artefacts JPEG can introduce around edges and text.
- Use PDF or SVG for vector elements such as logos or instrument line art, where suppliers support vector upload, because vector files scale to any mug size without softening.
- Export at 300 DPI at the mug's actual print size or larger. A lower-resolution image will not sharpen up in the file, so if your starting artwork is 72 DPI, redesign rather than simply resave it.
- Export in sRGB colour unless your supplier specifically requests a different profile, and expect small, natural colour shifts between a screen and a fired ceramic surface.
Tradeprint's specifications also flag vector logos and a minimum font size, generally nothing smaller than 8 pt, as a common source of blurry small text on finished mugs.
Pre-upload checklist before you order
A five-minute check before hitting "order" catches the vast majority of avoidable printing problems.
- Confirm you have selected the correct mug variant and that its overlay matches your canvas dimensions exactly.
- Zoom to 100% and check that text stays legible and raster images stay sharp at final print size, not just at a zoomed-out preview.
- Embed or outline any fonts before export, so nothing reflows or substitutes on the supplier's end.
- Export with the bleed included and accept that a small production tolerance, typically ±1 to 3 mm, is normal and already built into the template.
- Generate a mockup preview inside the actual product designer as your final check, not just a flat export sitting in a folder.
Pro Tip: If you're designing for a bulk or gift-shop order, request a physical sample or proof before committing to a large run. A screen preview can't show you exactly how ink sits on a curved, fired surface, and supplier templates do vary enough between vendors that a proof is cheap insurance.
Design notes for personalised music mugs
Personalised text has its own rules, separate from general mug artwork placement. Mugnificentdeals keeps names to roughly 7 to 12 characters and other personalised lines to about 20 to 40 characters, because longer strings shrink to the point where they lose legibility once wrapped around a curved 11 oz or 15 oz surface.
Instrument sketches and short captions work best kept simple: a single clean line drawing of a violin or drum kit reads far more clearly at mug scale than a busy, shaded illustration, and short captions sit more comfortably below or beside the artwork rather than curling around the handle. If you're still deciding between formats, the breakdown of 11 oz versus 15 oz mugs and the music teacher mug design workflow both walk through the practical trade offs in more depth.

Why templates matter more than measurements
Knowing the exact mug printing dimensions on paper only gets you halfway there. The real trade-off is between designing for maximum wrap coverage and designing for guaranteed clarity, and templates exist precisely to manage that tension for you rather than leaving it to guesswork. A design that ignores the overlay might look bolder in theory, but it's the template, not the ruler, that tells you what will actually survive the curve of the mug and the seam of the handle. When in doubt, lean on the product designer's overlay and Mugnificentdeals's own guidance rather than trusting eyeballed measurements alone.
— Lasse
Order a personalised music mug built around these dimensions
Template and overlay support helps ensure your instrument sketch, name, or gift message lands exactly where you designed it, not wherever the wrap happens to fall. Our personalised music mugs collection is built around the printable areas and character limits covered above, with a live preview so you can check placement before you commit to an order.

Choosing between an 11 oz and 15 oz mug, or picking a design for a music teacher, student, or fellow musician? Browse our best personalised music mugs for gifts or start from our main collection to upload your artwork and see it mocked up on the exact mug shape you've chosen before you place your order.
Sources
- What is the printable area for mugs?
- Mug design best practices
- Branded Mugs | Design Online
- DIY Mug Design: Print-Ready File Guide